Today I want to show you how to make mason jar salads. They are so versatile, fun, and meal prep friendly that you’ll want to make all your salads in mason jars!
They are perfect for grab-and-go lunches that can be prepped on a Sunday and taken to work throughout the week. The best thing is that it takes just 10 minutes to assemble these.

WANT TO SAVE THIS RECIPE?
Why you’ll love mason jar salads
Although Ali and I work from home, I have been making these lately for us in 32-ounce jars that, when filled up to the top, give us an entree-sized salad that is super filling and the perfect size.
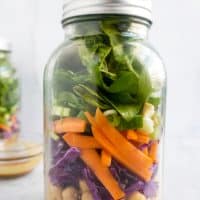
The cool thing about mason jar salads is that you can use any recipe you want, just learn how to layer, and you’re good to go.
Here I am sharing an Asian-inspired salad with a flavor profile similar to my TikTok-inspired cucumber salad jar, Thai salad, and carrot cucumber salad.
How to Make Salad in a Jar
As I said, a layering strategy is required to prevent your leafy greens from wilting and keep the salad fresh. Follow the steps below and then layer your salad for great results every time.
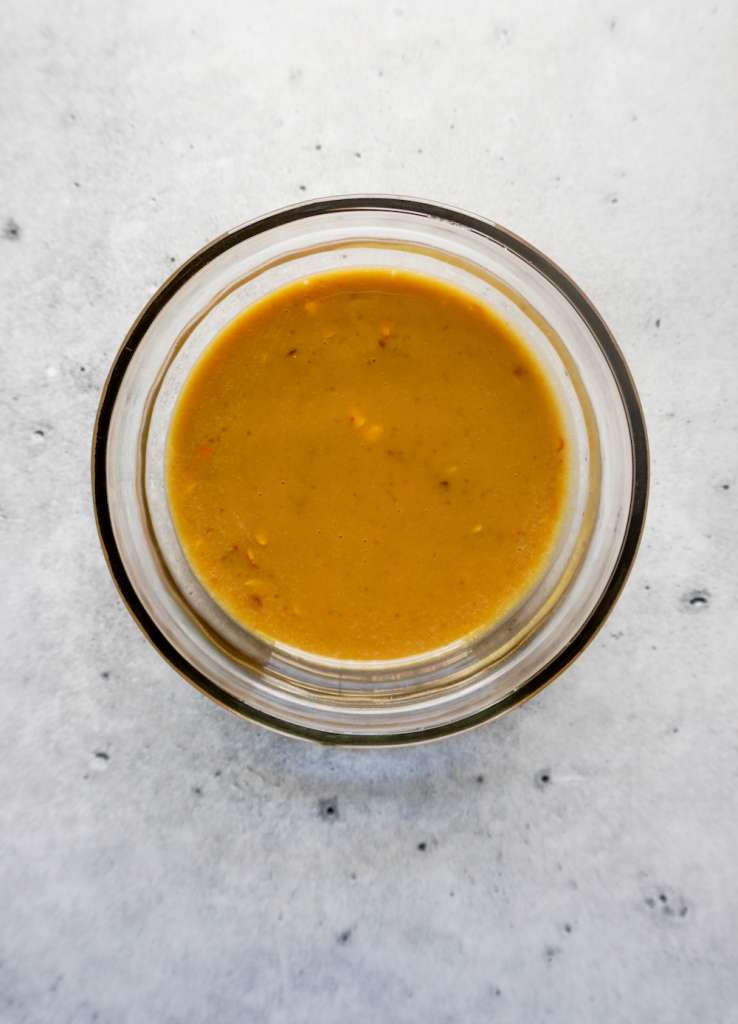
Step 1: Make the dressing
Start out by making the dressing and set that aside. Alternatively, you can use store-bought dressing. I also like using this easy, homemade spicy cashew dressing in my mason jar salads.
step 2: Chop the vegetables & get your protein ready
Chop the vegetables, drain the chickpeas and have an assembly line ready to go!
step 3: Assemble the jars
layer 1: dressing
This goes right at the bottom so as to avoid your delicate leafy greens touching it and wilting. The whole idea is to not have the dressing and the greens touch.
layer 2: tough veggies
Vegetables like cabbage and carrots can go in next as they are not prone to wilting like spinach and lettuce. Feel free to add bell peppers here as well instead of carrots or along with it, this is your salad and you get to make it yours!
layer 3: protein
As far as protein is concerned, you can use chickpeas, chicken, beef, or even tofu. Since chickpeas are heartier, I layered them on top of the dressing in the picture above but you can layer them higher up as well.

layer 4: other veggies
I like to put cucumbers at this layer as it does give off water but would get soggy down near the dressing.
layer 5: leafy greens
This includes spring onions, spinach, kale, cilantro, arugula and lettuce. basically any green that can wilt.
layer 6: nuts, seeds and or other crunchy toppings
Nuts and seeds go last and now all you have to do is make sure the jars are sealed and refrigerated ready to grab and go in the morning!
Mason Jar Salad FAQs
These salads stay fresh for up to three days in the fridge.
No worries, you can use any large jar or even an airtight container. As long as you layer the components as mentioned above, you’re good!
Here are more meal prep-friendly recipes to try:
If you try this recipe, I’d appreciate it so much if you would rate it! And let me know in the comments how it worked out for you. If you are on social media, share your pics with me on Instagram by tagging me @eatdrinkpure so I can see and repost it on my stories!
Mason Jar Salads
Equipment
- 2 wide mouth mason jars 32 oz. jar
Ingredients
- 1/4 head red cabbage
- 1 carrot
- 1 15 ounce can chickpeas
- 1/2 english cucumber
- 1 stalk green onion
- 2 handfuls spinach
- 3-4 sprigs cilantro
- 5-6 cashews chopped
Dressing
- 1/4 cup peanut butter
- 2 tablespoons coconut aminos/soy sauce
- 1 tablespoon honey/maple syrup
- 1 tablespoon rice vinegar/white vinegar
- 1 teaspoon minced ginger
- 1 teaspoon minced garlic
- 1/2 teaspoon salt
- 1 teaspoon crushed red pepper
- 1-2 tablespoons water
Instructions
- Start by making the dressing. Add all the ingredients to a small bowl and whisk together. Set it aside
- Next assemble the salads.
- In the mason jar add the 2-3 tablespoons dressing depending on your preference.
- Next add the cabbage and carrots.
- Press down after each layer and spread the veggies out so that each layer is clearly visible. This adds to the beauty of these salads.
- Next add your protein of choice. I added chickpeas but could easily have added chicken or beef.
- Add the cucumbers
- Add the green onions, spinach and cilantro
- Lastly add the cashews.
- Seal the jar tight and store in the refrigerator for up to 3 days.
Video
Notes
- If you have a peanut allergy, you can easily substitute with almond butter without taking away from the flavor although I prefer peanut butter in this recipe myself:) Just adjust seasonings accordingly.
- You can make this salad vegan by switching out the honey with maple syrup. Make the dressing Whole30 approved by leaving out the sweeteners altogether.
- Make it keto/low carb by substituting the honey with stevia drops and use chicken or beef instead of chickpeas/garbanzo beans.
Zeeshan Shah says
Love how easy these are to grab and go!